Introduction to Polkadot (DOT) staking
Polkadot is a fully-sharded blockchain connecting various networks in a secure environment. Described as a ‘Layer-0’ protocol, Polkadot enables interaction between previously incompatible chains and allows them to function in parallel.
In this article, we have a look at the main features of the mechanism that enables DOT staking and explain the unique features of the Polkadot network as far as staking is concerned. We also show you how to stake your DOT using the Polkadot UI.
How does Polkadot staking work?
Polkadot staking functions on the Nominated Proof-of-Stake (NPoS) consensus mechanism.
The NPoS is an evolved version of the traditional Proof of Stake mechanism. While both NPoS and PoS activate rewards by staking, in NPoS only the nodes that are nominated by the voters are allowed to validate new blocks.
In a Proof-of-Stake environment, the participants with the knowledge and resources required to run nodes are limited, which can lead to undesired centralization. These validators can end up influencing the network functionality and increasing operational costs. The NPoS mechanism prevents this from happening by giving investors the right to vote and select validators to represent them.
Validators vs nominators
The two most important groups of participants in the Polkadot ecosystem are the validators and the nominators. As in virtually any other Proof of Stake network, the validators are the network nodes responsible for keeping the network live and validating each block.
If you're asking yourself what is a nominator, know that you're not alone. Polkadot employs a special system where nominators, i.e., the individuals who hold DOT, are in charge of choosing which nodes are allowed to validate.
Nominators play a crucial job in upholding the safety of the network. By letting nominators share in the risk and reward of choosing validators, this mechanism increases the likelihood that only the most trusted and secure nodes are selected to become validators.
Bonding vs staking
If you, as a token holder, wish to nominate a validator, the first step is to lock your tokens on-chain. The process of locking tokens is called “bonding” and the locked tokens are referred to as “bonded” or “staked” tokens. To unbond staked tokens, you must take into account that the Polkadot network has an unbonding period of 28 days.
Once you have selected the validators you want to support, your bonded tokens will be allocated to them. Unlike other Proof of Stake models that allow you to choose only one validator, Polakdot’s NPoS lets nominators select up to 16 validators, with the network distributing the rewards evenly among validators.
Note that, in the case of a slashing event, both the nominator and the validator are penalized. This aligns the incentives of the nominators with those of the validators to ensure that token-holders only nominate trusted validators.
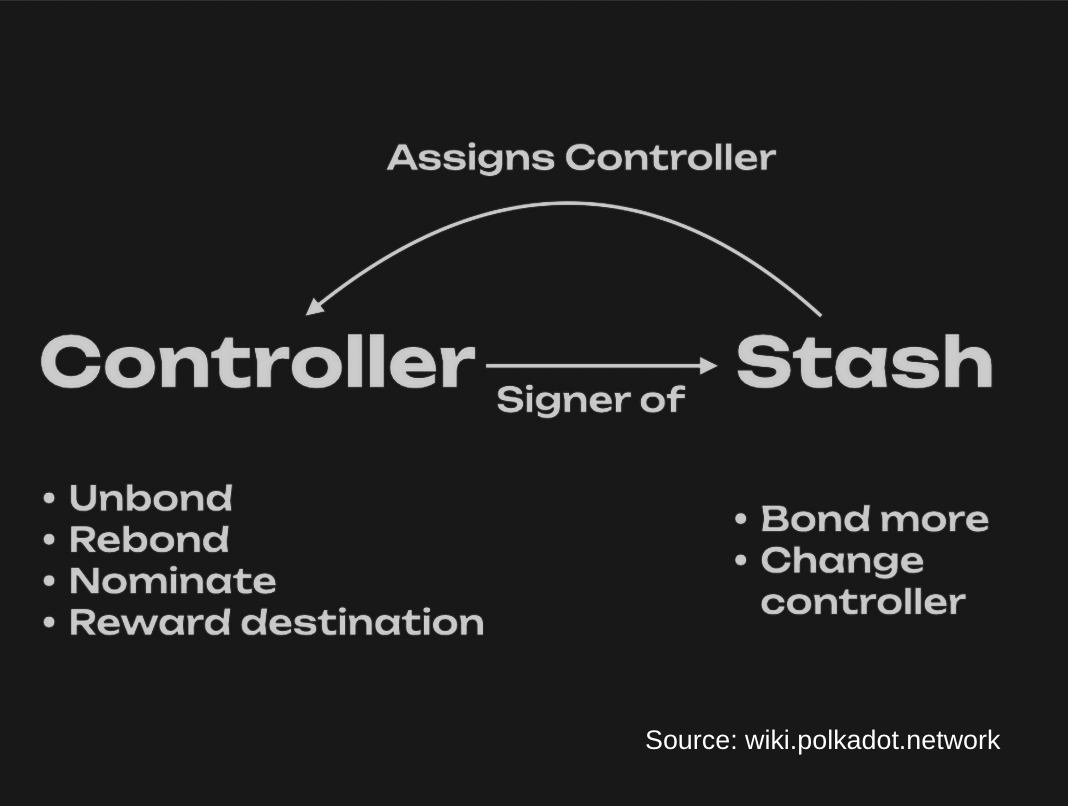
Controller vs stash accounts
To increase security, the Polkadot app offers two types of accounts: a stash account and a controller account.
- The stash account holds the tokens you wish to stake/bond. This account is like a cold storage account and is used for bonding and unbonding tokens, as well as for designating the controller account.
- The controller account is used to take actions related to the bonded tokens. Most of the staking actions, like verifying reward payout methods, nominating a validator, or unbonding staked tokens, are performed by the controller account.
Tools and apps for staking Polkadot
In order to interact with Polkadot.js apps, you first need to create an account for your funds. If you’re looking for a hassle-free way of staking your tokens, you may want to consider using an integrated platform like Finoa, which combines custody and staking. This way, you know your tokens are always secured, and you can stake and unstake them with just a few clicks.
If you want to engage in self-custody, the most secure way to create a Polkadot address is by using the Parity signer. You can also use the Polkadot user interface, in combination with the browser plugin. Using the Polkadot UI without the plugin is not recommended for security reasons.
For detailed guidance on creating a Polkadot account, watch the official video tutorial.
The Polkadot.js extension
The Polkadot.js browser extension can be used by any substrate-based blockchain to manage the stash and controller accounts, thus simplifying the process of signing transactions.
However, the Polkadot.js extension is not a wallet, therefore it can’t be used to send funds and trade tokens. To send DOT, you need to use the Polkadot.js user interface (UI).
Block explorers
Block explorers are useful online tools that allow you to view the latest activity on the blockchain. This includes transactions, addresses, recent blocks, and important metrics like the hash rate, average fees, block size, etc.
On the Polkadot UI, you can see some of this data by navigating to the “Explorer”, under the “Network” tab. If you are looking for aggregated chain data and specific stats, you can choose from a range of explorers, some of which were developed with support from the Polkadot treasury, such as Subscan.io.
A full list of explorers can be found on the Polkadot website.
Quick staking guide
If you’re wondering where to stake Polkadot tokens, these are the options you should consider:
- On exchanges like Kraken and Binance (advisable only for small amounts)
- Via a custodian, such as through Finoa’s ultra-secure in-custody staking
- Using a software wallet, via the Polkadot UI
- Using a hardware wallet like Ledger, via the Polkadot Ledger app.
One of the most common ways to stake is via the Polkadot user interface.
Staking DOT using Polkadot.js
Here is how you can nominate a validator and stake your DOT in a few simple steps:
- Go to https://polkadot.js.org/apps/#/staking and connect your wallet.
- Click “Account actions” in the Staking header menu.
- Click the "+ Nominator" button (top right).
- Choose your Stash and Controller accounts. Remember to keep some DOT in your accounts to pay transaction fees.
- Enter the amount you would like to stake in the "value bonded" field.
- In the next screen, search for your desired nominator (validator), then click "Bond & Nominate".
- Click "Sign & Submit" and enter your account password to sign the transaction.
If this process seems too complicated, note that you can avoid having to go through all of these steps when you opt for an in-custody staking solution. This makes it easy for you to store assets securely and stake them in just a few clicks, without having to move any crypto out of your account.
To save you the hassle of having to follow different procedures for every new asset, Finoa’s intuitive interface supports nine different Proof-of-Stake assets, with more constantly added. What’s more, safe custody means that you never have to worry about managing multiple on-chain wallets and storing keys.
Staking DOT using a proxy
Polkadot offers an advanced staking feature, via a proxy, which is a more powerful and flexible version of the controller account. Proxies are similar to controller accounts but enable you to increase your security and delegate efficiently without having to access your “cold” account (the stash account) frequently.
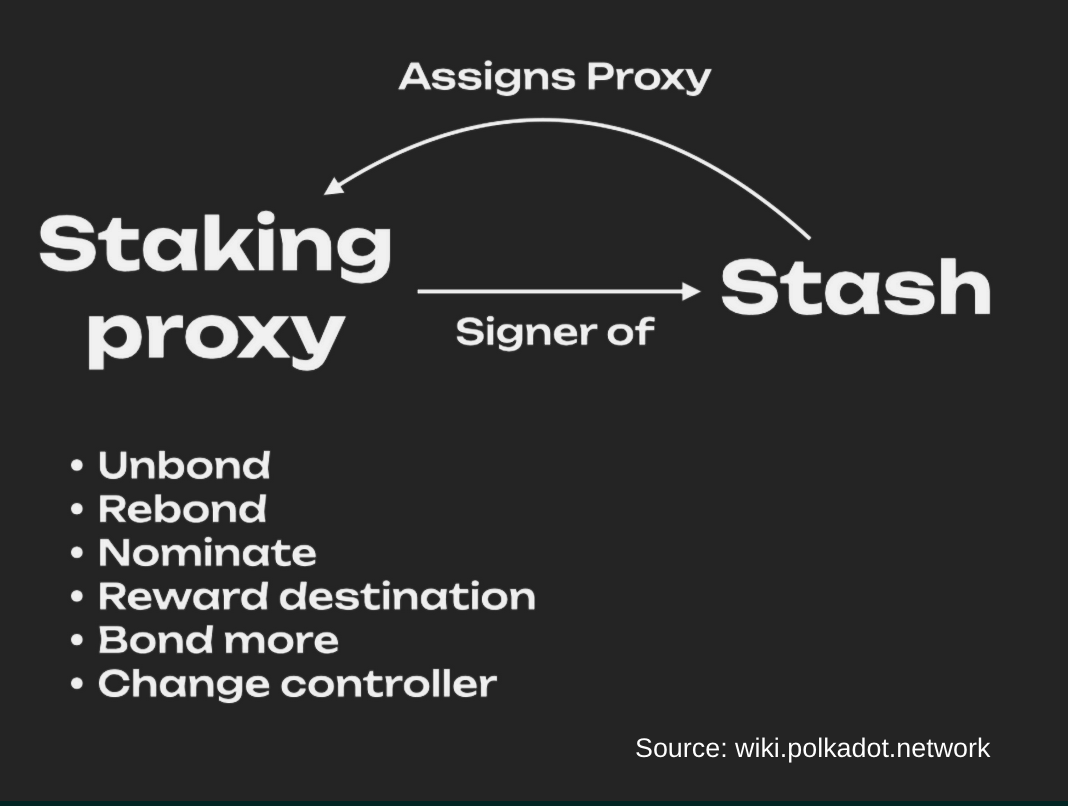
Proxies come in different types, of which the staking proxy is one. Your staking proxy is not the same as your controller account. Instead, it acts as a “bodyguard” to the controller account and facilitates the staking of bonded tokens without exposing the stash account. When you set up a staking proxy, everything is signed by the proxy, making the stash account less vulnerable. The role of the staking proxy is to facilitate staking on behalf of the stash account. Note that the proxy has no access to transfer-related transactions. If the proxy is compromised, the stash account can simply replace it with a new one.
Finoa makes it possible to earn $DOT rewards through delegated staking via proxy accounts. This service is provided by Finoa Consensus Services (FCS), the Finoa unit that builds distributed validator technology and blockchain infrastructure.
Running a Polkadot validator
Last but not least, another option to stake Polkadot tokens is by running your own validator. Although the high technical complexity of this staking method makes it inaccessible to most users, we’ve included it to round up our guide.
Running a validator is a complicated process that requires a combination of system administration experience, blockchain technology expertise, and a dependable, professional hardware stack.
The most important aspect of running a validator is security. The role of validator nodes is to keep the network secure, which makes running them on a live network a big responsibility. Not only do they answer for their own staked tokens, but they are also liable for the assets delegated to them. For a validator to be as secure as possible, several conditions must be met:
- Validators must have high availability
- The provider must have infrastructure that protects the validator’s signing keys to prevent attackers from taking control
- A robust monitoring system that includes 24/7 on-call availability for incident response
At Finoa, we set up and run managed validator nodes through our dedicated team at Finoa Consensus Sevices. Managed nodes give enterprise clients an edge when building new crypto products, enabling them to offer staking rewards to their own customers and grow their portfolios without relying on public nodes.
Final thoughts
Polkadot is a mature blockchain ecosystem that offers a breadth of options when it comes to staking. The good news is that, regardless of your level of expertise, you will be able to find a staking solution that can respond to your technical and security needs.
Finoa makes it easy for wealth managers and institutional investors to engage with Proof-of-Stake assets like Polkadot in a secure and compliant manner. Holders of Proof-of-Stake tokens such as Polkadot can safely earn rewards using the Finoa in-custody staking solution, or by delegating their stake to a validator run by Finoa Consensus Services.
Read more about Finoa's support for Polkadot staking or get in touch with our team to discuss your custom needs.
Disclaimer: This article is not intended to be, nor does it constitute financial advice. Finoa does not endorse or recommend any particular securities, currencies, or other financial products. This content is solely for informational purposes and is not to be construed as a solicitation or an offer to buy or sell any spot currency transactions, financial instruments, or other securities.